

Every iPhone from XS onwards supports eSIM — but navigating iPhone’s eSIM settings is not always intuitive, especially with iOS updates reorganizing menus across versions. Whether you are activating a new eSIM, switching between stored profiles, configuring dual SIM preferences, or troubleshooting a connection issue, knowing exactly where every eSIM setting lives in iOS saves significant time and frustration.
This guide covers every iPhone eSIM setting available in iOS 17 and iOS 18 — where to find them, what each setting does, and how to configure them for optimal performance on Indian carriers (Jio, Airtel, Vi) and international use.
- Check out Actical– Does my iPhone Support eSIM?
- Apple iPhone eSIM Transfer Guide 2026
- Apple iPhone eSIM only in 2026
- Apple iPhone eSIM Compatibility in 2026
iPhone eSIM — Which Models Support It
| iPhone Model | eSIM Support | Dual eSIM | Physical SIM |
|---|---|---|---|
| iPhone 16 series | ✅ | ✅ | ✅ (non-US) |
| iPhone 15 Pro/Max | ✅ | ✅ | ✅ (non-US) |
| iPhone 15/Plus | ✅ | ✅ | ✅ (non-US) |
| iPhone 14 series | ✅ | ✅ | ✅ (non-US) |
| iPhone 13 series | ✅ | ✅ | ✅ |
| iPhone 12 series | ✅ | ✅ | ✅ |
| iPhone 11 series | ✅ | ⚠️ Single eSIM | ✅ |
| iPhone XS/XR | ✅ | ⚠️ Single eSIM | ✅ |
| US iPhone 14/15/16 | ✅ | ✅ | ❌ eSIM only |
Finding iPhone eSIM Settings — iOS 17 and iOS 18
Primary eSIM Settings Location
iOS 18:
Settings → Cellular
All eSIM management happens within Cellular settings — the central hub for all SIM-related iPhone settings.
iOS 17:
Settings → Cellular
(Same location — iOS 17 and 18 handle Cellular settings identically)
Quick Access Methods
Method 1 — Settings search:
Settings app → search bar (top) → type “eSIM” → direct links to eSIM settings appear
Method 2 — Control Center:
Settings → Control Center → add Cellular Data switch → quick data SIM toggle
Method 3 — Siri:
“Hey Siri, open cellular settings” → jumps directly to Cellular settings
Complete iPhone eSIM Settings Breakdown
Settings → Cellular
Main Cellular screen shows:
1. Cellular Plans section:
Lists all active SIM lines — physical SIM and eSIM(s) — with carrier name and signal bars for each.
2. Add eSIM button:
Tap to activate a new eSIM via QR code, activation code, or transfer from a nearby iPhone.
3. Default Line:
Select which line handles outgoing calls by default.
4. Cellular Data:
Select which line handles mobile data.
5. Allow Cellular Data Switching:
Toggle — when enabled, iPhone automatically uses the other SIM for data if the primary data SIM has no signal.
Adding eSIM — Settings → Cellular → Add eSIM
Four activation options appear:
1. Use QR Code:
Opens iPhone camera for scanning carrier QR code.
→ Point at QR code → plan details appear → tap Continue → eSIM downloads
2. Enter Details Manually:
Tap for manual activation code entry.
→ Type the SM-DP+ address and activation code from the carrier
→ Useful when the QR code is sent to the same device being activated
3. Transfer from Nearby iPhone:
Place the old iPhone near the new iPhone for wireless eSIM transfer.
→ Requires iOS 16+ on both devices
→ Some carriers support direct transfer — others require a new QR code
4. Use Carrier App:
Opens the App Store to download the specific carrier app for activation.
→ Jio → MyJio app
→ Airtel → Airtel Thanks app
→ Vi → Vi app
Individual Line Settings — Settings → Cellular → [Line Name]
Tap any cellular line (physical SIM or eSIM) to access its specific settings:
Line Label:
Customize name — “Personal,” “Work,” “Jio,” “Airtel” — shown throughout iPhone UI.
Turn On This Line:
Toggle line on/off — turning off saves battery without deleting eSIM profile.
Roaming:
- Data Roaming: Toggle on for data when abroad (carrier charges apply)
- Voice & Data: Select 5G, LTE, or lower for this specific line
Network Selection:
- Automatic: iPhone selects best available network
- Manual: Force connection to specific carrier network
Wi-Fi Calling:
Enable Wi-Fi Calling for this line if carrier supports it — calls over Wi-Fi when cellular signal is poor.
VoLTE:
Enable Voice over LTE for this line — HD voice calls over 4G network.
Cellular Data Options:
- Data Mode: Standard, Low Data Mode, or Allow More Data on 5G
- 5G Auto or 5G On: Control when iPhone uses 5G vs LTE
SIM PIN:
Set PIN for this eSIM line — protects against unauthorized use if iPhone is lost.
Dual SIM Configuration — Key Settings
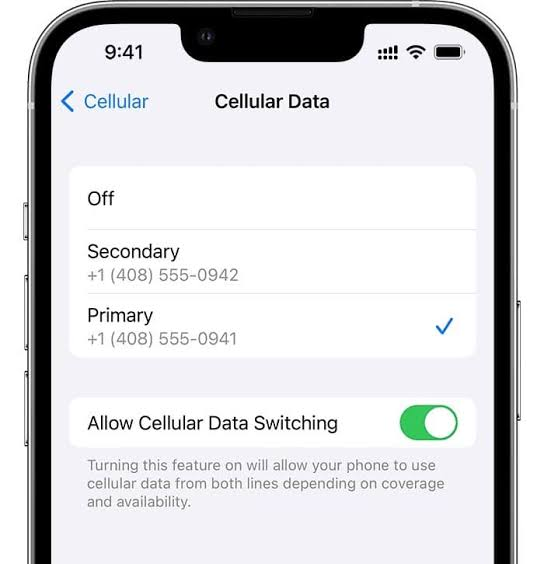
For iPhones with multiple active lines (physical SIM + eSIM), these settings control how both lines work together:
Default Line — Settings → Cellular → Default Line
What it controls: Which number is used for outgoing calls when you dial directly (not from contacts with an assigned line).
Options:
- Select physical SIM
- Select eSIM line 1
- Ask Every Time — iPhone prompts before each call
Recommendation for Indian users:
If both Jio and Airtel are active — set Airtel as the default voice line (typically better voice quality) and Jio as the cellular data line.
Cellular Data — Settings → Cellular → Cellular Data
What it controls: Which SIM line provides mobile data.
Options:
- Physical SIM
- eSIM line 1 (or specific eSIM name)
Only one line can be active for data at a time — the other remains registered for calls and SMS only.
Allow Cellular Data Switching:
Toggle the data selection below — when enabled:
- Primary data SIM loses signal → iPhone automatically switches to the other SIM for data
- Returns to primary when signal restored
- May increase data costs if lines have different data plans
Recommendation: Enable for travel in areas with patchy coverage — disable if both lines have limited data plans.
iMessage & FaceTime — Settings → Cellular → [Line] → iMessage & FaceTime
What it controls: Which phone number Apple services (iMessage, FaceTime) use for this line.
Important for Indian dual SIM users:
Set primary number for iMessage — ensures iMessages arrive on the correct number when contacts message you.
Managing Stored eSIM Profiles
View All Stored eSIMs
Settings → Cellular → [scroll to bottom] → eSIM section
All stored eSIM profiles listed — both active and inactive.
Active eSIMs: Show network name and signal bars
Inactive eSIMs: Show “Off” or “Inactive” status
Switch Between Stored eSIM Profiles
Settings → Cellular → [inactive eSIM profile] → Turn On This Line
Switching between stored eSIM profiles:
- Current active eSIM turns off automatically
- Selected eSIM activates
- Network registration: 1–3 minutes
- Carrier notification sent (some carriers)
Useful for: Travel eSIMs — switch between Indian carrier eSIM and international travel eSIM without deleting either.
Delete eSIM Profile
Settings → Cellular → [eSIM profile] → Delete eSIM
Confirmation prompt appears → tap Delete eSIM again to confirm.
Important warnings:
- Deletion is PERMANENT on the device
- Contact carrier BEFORE deleting to arrange re-issuance
- Some carriers charge a re-issuance fee
- Your number and plan are preserved by the carrier — only the device profile is deleted
When to delete:
- Switching carriers permanently
- Selling iPhone (always delete before selling)
- eSIM profile corrupted and needs fresh activation
APN Settings — Settings → Cellular → [Line] → Cellular Data Network
What is APN:
Access Point Name — configuration for mobile data connection. Usually auto-configured by the carrier when the eSIM activates.
When to configure manually:
- Data not working after eSIM activation
- Carrier did not push APN configuration automatically
Manual APN for Jio:
- APN: jionet
- Username: (leave blank)
- Password: (leave blank)
- MMS APN: jionet
- MMS Proxy: (leave blank)
- MMS Max Message Size: 1048576
Manual APN for Airtel:
- APN: airtelgprs.com
- Username: (leave blank)
- Password: (leave blank)
- MMS APN: airtelfun.com
- MMS Proxy: 100.1.200.99
- MMS Port: 8080
Manual APN for Vi:
- APN: www
- Username: (leave blank)
- Password: (leave blank)
Reset APN to default:
Settings → Cellular → [line] → Cellular Data Network → Reset Settings (bottom of page)
Network Settings — Settings → Cellular → [Line] → Voice & Data
Controls which network generation iPhone uses for each line:
5G On: Always use 5G when available — fastest, most battery impact
5G Auto: Use 5G when significantly better than LTE — better battery
LTE: Use LTE only — use when 5G coverage is spotty
3G/2G: Legacy — only in very limited coverage areas
Recommendation for India (Jio 5G):
Set to 5G Auto — uses 5G when available and beneficial, falls back to LTE in non-5G areas without battery penalty.
Wi-Fi Calling — Settings → Cellular → [Line] → Wi-Fi Calling
What it does:
Routes voice calls through Wi-Fi instead of the cellular network — improves call quality in areas with poor cellular signal but good Wi-Fi.
Enabling Wi-Fi Calling:
Settings → Cellular → [line name] → Wi-Fi Calling → toggle On → confirm
Indian carrier Wi-Fi Calling support:
- Jio: ✅ Supports Wi-Fi Calling on iPhone
- Airtel: ✅ Supports Wi-Fi Calling on iPhone
- Vi: ⚠️ Limited support
When Wi-Fi Calling is most useful:
- Office buildings with poor cellular signal
- Basements and underground areas
- Calls made from abroad over hotel Wi-Fi (avoids international roaming charges)
VoLTE Settings — Settings → Cellular → [Line] → Voice & Data
VoLTE (Voice over LTE): HD voice calls over 4G network — better quality than 3G voice calls.
Enable VoLTE:
Settings → Cellular → [line] → Voice & Data → ensure LTE is selected → VoLTE toggles appear.
Indian carrier VoLTE support:
- Jio: ✅ VoLTE default (Jio is a VoLTE-only network)
- Airtel: ✅ VoLTE supported
- Vi: ✅ VoLTE supported
iPhone eSIM Quick Settings — Control Center
Adding SIM Controls to Control Center
Settings → Control Center → Add Controls
Useful eSIM-related Control Center additions:
- Cellular Data — quick toggle data on/off
- Wi-Fi — toggle Wi-Fi (affects Wi-Fi Calling)
- Do Not Disturb — silence specific line
iPhone eSIM — iOS 18 Specific Features

Improved eSIM Backup
iOS 18 backs up eSIM configuration to iCloud — when setting up a new iPhone from a backup, eSIM settings restore automatically.
Ensure iCloud backup includes eSIM:
Settings → [your name] → iCloud → iCloud Backup → toggle On → Back Up Now
eSIM Quick Transfer (iOS 16+)
Transfer eSIM wirelessly between iPhones without contacting carrier (where supported):
Settings → Cellular → Add eSIM → Transfer from Nearby iPhone
Requirements:
- Both iPhones on iOS 16 or later
- Both connected to the same Wi-Fi or Bluetooth enabled
- Carrier must support Quick Transfer
Supported Indian carriers for Quick Transfer:
- Jio: ✅ Supports Quick Transfer
- Airtel: ⚠️ Partial support — some profiles transfer, others need a new QR
Line Focus Settings
iOS 18 allows specific Focus modes to use specific SIM lines — powerful for work/personal separation:
Settings → Focus → Work → [customize] → Calls → Allowed Calls → from [work line only]
Incoming calls on personal line suppressed during Work Focus — calls only ring from work eSIM.
Troubleshooting eSIM Settings
eSIM Not Showing in Cellular Settings
Checklist:
- Settings → General → About → check for carrier settings update
- Update iOS — Settings → General → Software Update
- Restart iPhone
- Check iPhone model supports eSIM (*#06# for EID)
No Service on eSIM After Activation
Fix sequence:
- Settings → Cellular → [affected line] → Turn Off This Line → wait 10 seconds → Turn On This Line
- Settings → Cellular → [line] → Network Selection → Automatic
- Airplane Mode on → 30 seconds → Airplane Mode off
- Restart iPhone
- Settings → General → Transfer or Reset iPhone → Reset → Reset Network Settings
Cellular Data Not Working on eSIM
Checklist:
- Settings → Cellular → Cellular Data → confirm correct line selected
- Settings → Cellular → [line] → Cellular Data Options → confirm data enabled
- Check APN settings are correct for carrier (see APN section above)
- Confirm carrier eSIM plan includes data (not voice-only plan)
- Toggle Data Roaming if outside home network
Calls Going to Wrong SIM
Fix:
Settings → Cellular → Default Line → select correct default call line
For contacts with specific line assigned:
Open Contact → Edit → select phone number → assign to specific line → Save
Battery Drain with Multiple Active SIMs
Optimization:
Settings → Cellular → lines you rarely use → Turn Off This Line (profile kept, line inactive)
Settings → Cellular → Cellular Data → Allow Cellular Data Switching → toggle Off (if not needed)
eSIM Profile Grayed Out
Cause: Carrier-locked iPhone or unsupported carrier profile.
Fix:
- Contact Apple Support for unlock if carrier-locked
- Contact carrier to verify eSIM profile compatibility with your iPhone model
- Settings → General → About → check carrier settings version is up to date
International Travel eSIM Settings
Pre-Travel Setup
1. Add international travel eSIM:
Settings → Cellular → Add eSIM → scan Airalo/Nomad QR code → activate to eSIM slot 2
2. Label it clearly:
Settings → Cellular → [travel eSIM] → Label: “Travel – [Country].”
3. Configure for abroad:
Keep Indian eSIM/SIM active (for banking OTPs) → set travel eSIM as data line when abroad
Abroad Configuration
Settings → Cellular → Cellular Data → select travel eSIM
Settings → Cellular → [Indian line] → Data Roaming → OFF (avoid unexpected roaming charges)
Settings → Cellular → Allow Cellular Data Switching → OFF (prevent accidental Indian SIM data roaming)
Return to India
Settings → Cellular → Cellular Data → select Indian line
Settings → Cellular → [Indian line] → Data Roaming → confirm OFF (not needed in India)
Settings → Cellular → [travel eSIM] → Turn Off This Line (keep profile stored for next trip)
iPhone eSIM Settings for Indian Users — Quick Reference
| Setting | Location | Recommended Value |
|---|---|---|
| Default call line | Cellular → Default Line | Airtel (better voice) |
| Cellular data | Cellular → Cellular Data | Jio (best 5G) |
| Data switching | Cellular → Allow Switching | On (travel) / Off (home) |
| 5G mode (Jio) | Cellular → Jio → Voice & Data | 5G Auto |
| Wi-Fi Calling | Cellular → [line] → Wi-Fi Calling | On (Jio/Airtel) |
| VoLTE | Cellular → [line] → Voice & Data | Enabled |
| Data Roaming | Cellular → [line] → Data Roaming | Off (home) |
| iMessage line | Cellular → [line] → iMessage | Primary number |
Frequently Asked Questions
Where are eSIM settings on iPhone?
Settings → Cellular — all eSIM management on iPhone happens within Cellular settings. Tap any listed plan to access its individual settings. Tap Add eSIM to activate a new eSIM via QR code, activation code, or transfer.
How do I switch between eSIMs on iPhone?
Settings → Cellular → tap the eSIM you want to activate → Turn On This Line. The previously active eSIM turns off automatically. Network registration takes 1–3 minutes.
How do I delete an eSIM from iPhone?
Settings → Cellular → tap eSIM profile → Delete eSIM → confirm. Contact your carrier before deleting to arrange re-issuance — deletion is permanent on the device.
Can I have both Jio and Airtel active on iPhone simultaneously?
Yes — on dual eSIM iPhones (iPhone 13 onwards), both Jio and Airtel can be active simultaneously. Both receive calls and SMS — only one handles data at a time. Configure via Settings → Cellular → Cellular Data.
How do I set up APN manually on iPhone eSIM?
Settings → Cellular → tap eSIM line → Cellular Data Network → enter APN details. For Jio: APN = jionet. For Airtel: APN = airtelgprs.com. Leave username and password blank for both.
Where is the eSIM QR scanner on iPhone?
Settings → Cellular → Add eSIM → Use QR Code → iPhone camera opens for scanning. Keep the QR code steady at 15–30cm from the camera — recognition is fast on all recent iPhone models.
Conclusion
iPhone eSIM settings in iOS 17 and iOS 18 are organized logically within Settings → Cellular — once you know where everything lives, managing eSIM profiles, switching lines, configuring dual SIM preferences, and troubleshooting connection issues becomes straightforward.
Key settings every iPhone eSIM user needs:
- Add eSIM: Settings → Cellular → Add eSIM → Use QR Code
- Switch data line: Settings → Cellular → Cellular Data → select line
- Default call line: Settings → Cellular → Default Line
- Delete eSIM: Settings → Cellular → [line] → Delete eSIM
- APN fix: Settings → Cellular → [line] → Cellular Data Network
For Indian users running Jio + Airtel on a dual-eSIM iPhone — set Airtel as the default call line, Jio as cellular data, enable 5G Auto on the Jio line, and enable Wi-Fi Calling on both lines for the best overall connectivity experience.

